

Custom Walk In Closet Designs for Modern Layouts: A Complete Critical Engineering
Whether you’re starting from scratch or finally fed up with a closet that never quite works, this guide covers everything you need to know about custom walk in closet designs: real layouts, actual dimensions, materials, lighting, and the planning steps that make the difference between a closet you love and one you just tolerate.
Let’s be straightforward about something. Most closets are not designed, they’re just built. Shelves get added, rails get screwed in, and then everything gets shoved in until the door barely closes. It’s not a design problem. It’s a planning problem.
A custom walk-in closet flips that entirely. Instead of making your wardrobe fit a generic space, you build the space around your actual wardrobe. If you have 40 pairs of shoes, you get a proper shoe zone. If most of your clothes are folded, you get more shelves and fewer rails. If you share the closet with a partner who organizes completely differently from you, each side gets its own logic.
That’s what “custom” actually means here. Not just pretty wood and built-in lighting, though those help too. It means the whole layout makes sense for how you live.
What Makes Custom Walk In Closet Designs Different?
Stock closet systems are designed around a hypothetical average person. They come in fixed widths, fixed depths, and fixed configurations. You make your life fit them.
Custom walk in closet designs work the other way around. Every dimension, every zone, every shelf height is decided based on three things: the shape and size of your room, the specific items you store, and the aesthetic you want to live with every morning.
The result is a closet that does not just store clothes. It actually speeds up your morning routine, keeps everything visible and accessible, and honestly makes the act of getting dressed feel a bit more considered.
I’ve seen homeowners spend good money on stock closet systems and then quietly tear them out within two years because the proportions were just slightly off. The hanging rails sagged, the drawers were too shallow, or the whole thing looked dated the moment it went in. Getting the layout right from the start is always the smarter move, even when it costs more upfront.
The 4 Main Custom Walk In Closet Design Layouts
Before we look at specific designs and images, it helps to understand the four foundational floor plan configurations. Almost every custom walk in closet design you’ll come across uses one of these layouts, or a combination of them.
1. L-Shaped Layout: The Reliable Classic
The L-shaped layout runs storage along two adjacent walls, forming an “L” when you look at the floor plan from above. It is one of the most popular custom walk in closet designs for medium-sized rooms because it gives you a generous, uninterrupted storage run without making the room feel closed in.
Look at the design below. This L-shaped closet pairs warm walnut wood frames with matte white panels and push-to-open drawers. The left tower handles folded wear and slanted shoe racks, the main bay contains a hanging rail above three seamless drawers, and the right wall opens up into a full grid of 12 open cubbies for bags, hats, and shoes.
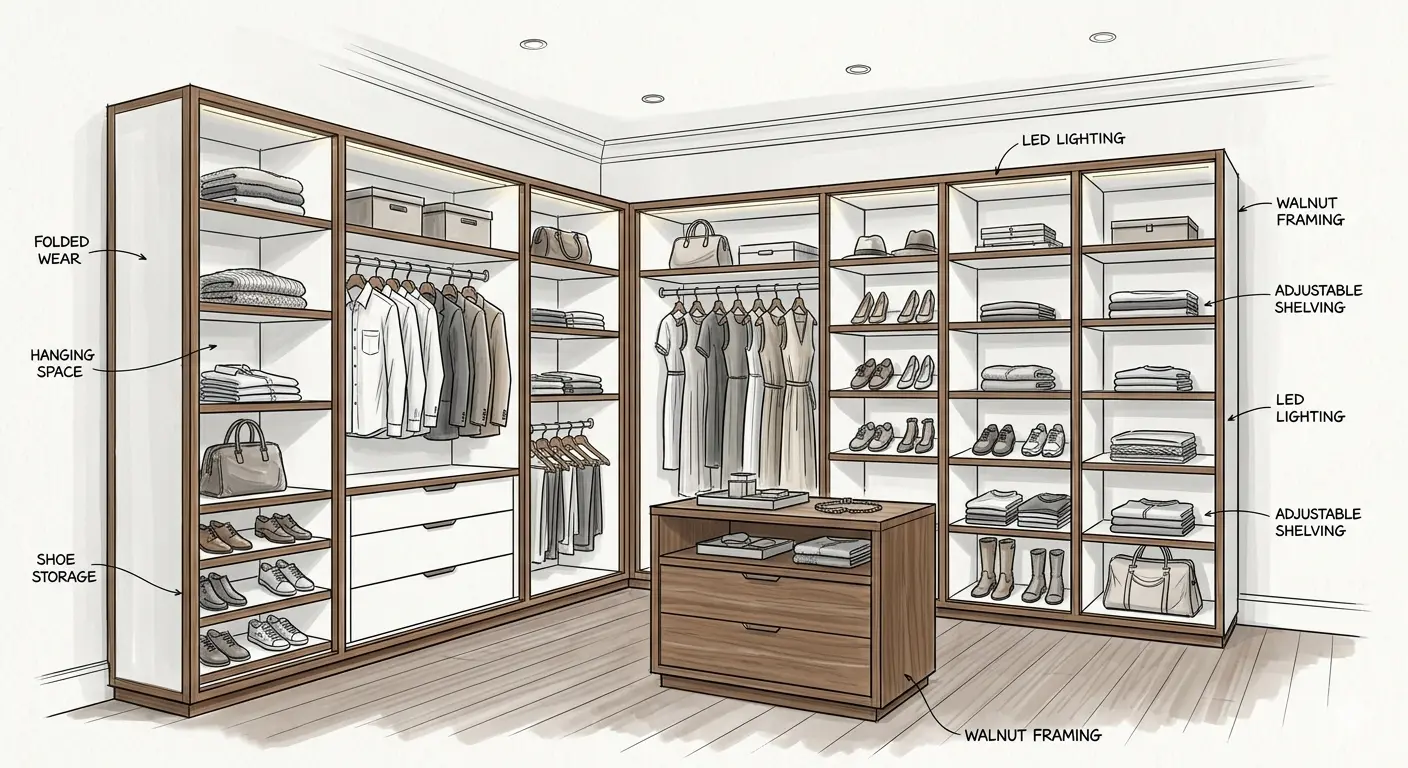
A few details worth noting here. The central island sits at approximately 120 cm L x 60 cm W x 90 cm H, positioned with a clear 90 cm walkway on all sides. The LED strips are recessed into the inner edges of each frame unit at a warm 3000K color temperature, which creates a glow that highlights texture rather than washing everything out.
The push-to-open hardware on the drawers is worth mentioning because it’s the kind of choice that keeps the whole design looking intentional, not accidental. No visible handles, no visual clutter, no surface to catch dust.
Ceiling height here sits at around 275 cm (approx. 9 ft), with the standard cabinetry depth of 60 cm (24 inches) to accommodate hangers properly. Both of these numbers matter more than most people realize when planning a custom walk in closet design.
2. Corner Walk-In Closet Design: Eliminating the Dead Zone
In most closets, the corner is wasted space. Items get pushed back there, forgotten, and eventually buried. A well-planned corner walk-in closet design solves this with one straightforward idea: curved, wrap-around shelving.
Instead of two flat walls meeting at a hard right angle, the shelves sweep continuously through the corner. Everything remains visible and within arm’s reach. No dead zone, no wasted square footage.
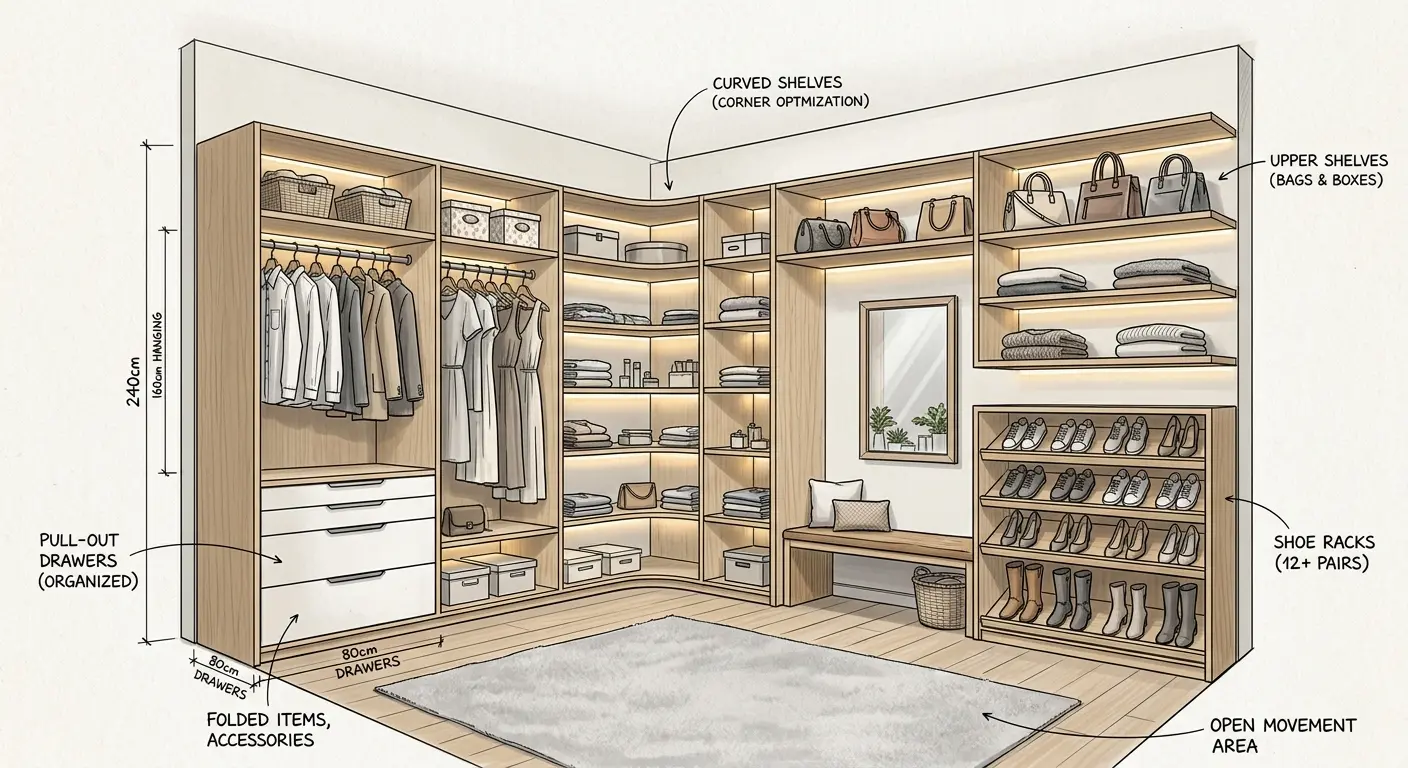
The total cabinetry height here reaches 240 cm, with the primary hanging section allocated 160 cm of clearance, enough for full-length dresses and coats without bunching at the bottom. The drawers run to 80 cm wide with a handle-less, minimalist face.
The right wing of this design doubles as a dressing station: a built-in oak bench for putting shoes on, a wall-mounted mirror above it, and open shelving above that for bags and seasonal boxes. The far-right end drops into an angled shoe rack, purpose-built for 12 or more pairs.
This is an excellent custom walk in closet design for a master bedroom with a dedicated corner space. It also works well as a shared closet when you split the left and right wings between two people with different storage habits.
3. Open-Concept L-Shape: The Calm Everyday Closet
If you want something that looks like the interior of a well-organized furniture store and actually functions even better than it looks, the open-concept L-shaped layout is worth serious consideration.
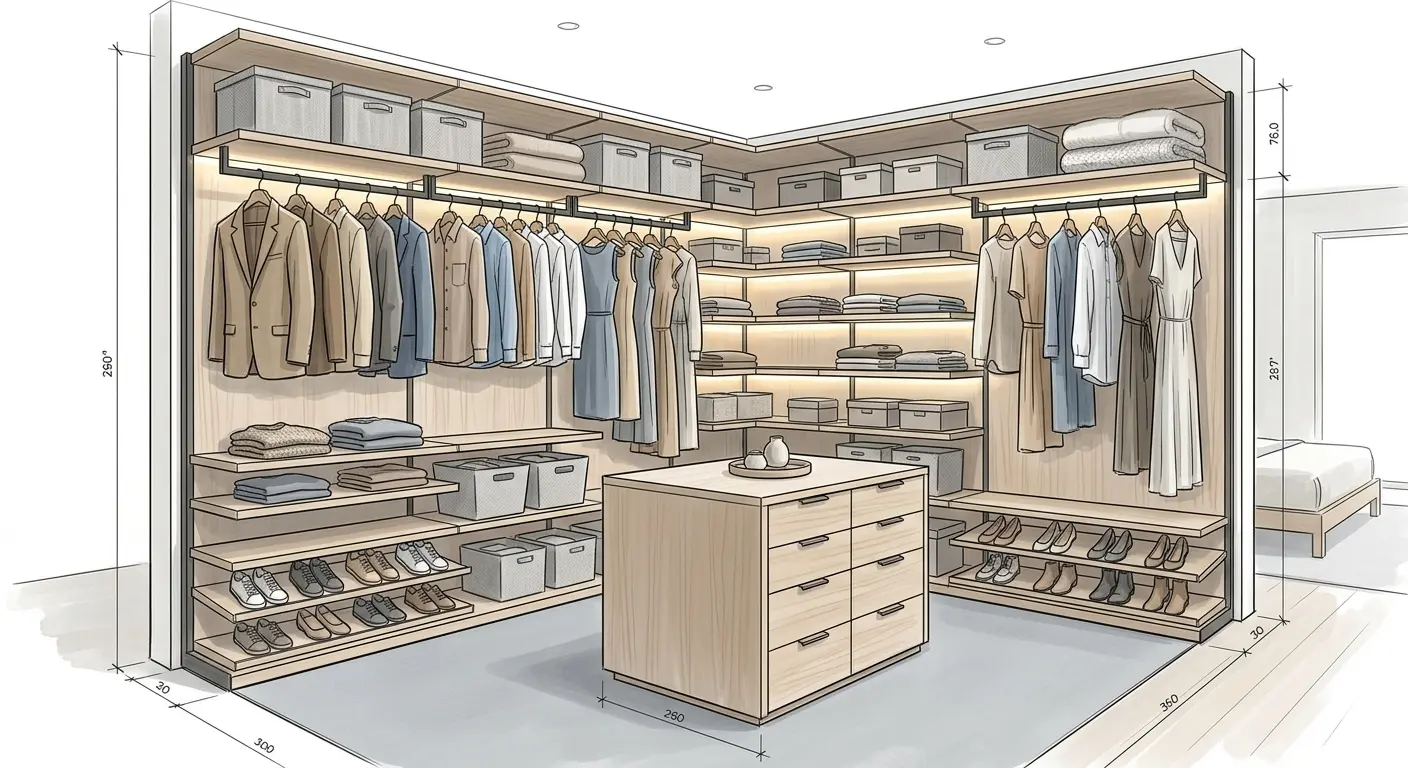
The dimensions here are generous. The left wall spans 300 cm, the right extends to 350 cm, and the full cabinetry height reaches 250 cm. A standard 90 to 100 cm walkway wraps around the central island on all sides, keeping the whole space breathable and comfortable to move in.
The layout breaks down into clear horizontal zones from top to bottom: upper shelves for seasonal storage boxes, double-hanging rails at eye level for shirts and shorter items, single long-hang sections on the right for dresses and coats, mid-section open shelves for folded sweaters, and a lower tier of shoe racks running across the base.
The central island at 80 cm x 80 cm provides a staging surface with six drawers for accessories. Under-shelf LED strips cast a downward warm glow across the garments. Vertical partitions spaced every 80 to 100 cm prevent the rails from sagging, which is a structural detail a lot of people miss until it’s too late.
4. U-Shaped Boutique Layout: The High-End Option
If you have the room and you want the most immersive custom walk in closet design possible, the U-shaped layout is the answer. Storage wraps around three walls, leaving the center open for dressing. The effect is somewhere between a luxury boutique and a high-end hotel suite.
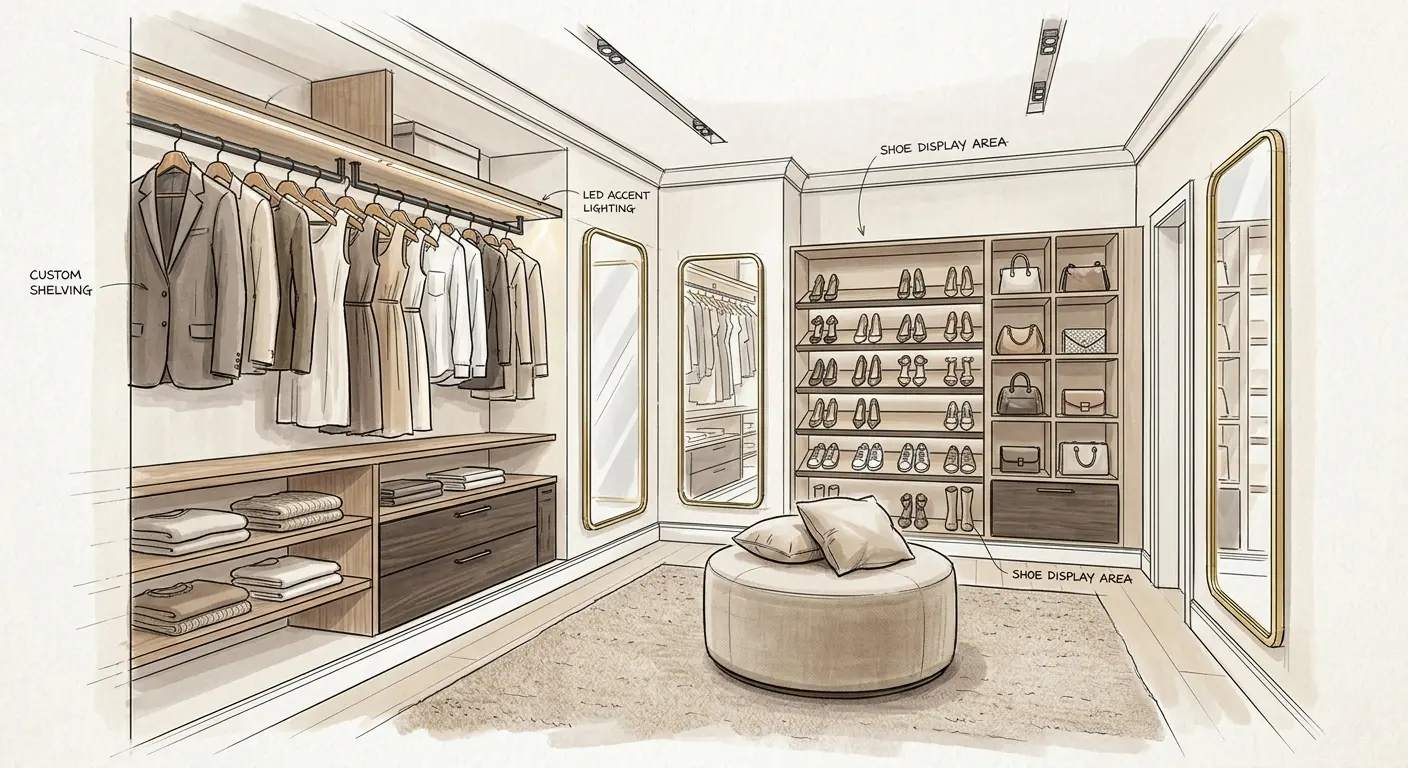
This design works in a room approximately 12 ft x 15 ft (3.6m x 4.5m) with a 9 to 10 ft ceiling. Zone A on the left is dedicated to hanging storage and drawers. Zone B across the rear wall becomes the visual focal point: a full shoe and handbag display with five levels of tilted shelving and cubbies specifically sized for bags at roughly 15 x 15 inches. Zone C on the right carries three floor-to-ceiling arched mirrors in thin brass frames, each approximately 2.5 ft wide x 7 ft tall.
The circular ottoman at the center, about 36 inches (91 cm) in diameter, plush velvet with two accent cushions, is not just a nice detail. It gives you a seat while dressing and it visually anchors the room without blocking the sightlines.
Honestly, if you’ve ever walked into a boutique hotel and wondered why their closet feels so different from yours, it’s usually this layout combined with layered lighting and a consistent material palette. None of it is magic, it’s just intentional design.
Which Custom Walk In Closet Layout Fits Your Room?
Not every room suits every layout. Here’s a quick reference to help you match the design to your actual space:
Medium Rooms
Corner Spaces
Large Rooms
Long Narrow Rooms
Custom Walk In Closet Designs for Small Spaces
Here’s something worth saying clearly: a small walk-in closet can be just as useful as a large one when the design is smart enough. Square footage matters less than layout logic.
The closet below fits into a room just 7 feet wide, 6 feet deep, with an 8-foot ceiling. That’s a genuinely compact footprint. Yet it fits double hanging rods, a full shoe cubby grid, a vertical drawer stack, corner L-shaped shelving, slim accessory drawers, and a center bench with under-bench storage. A built-in full-length mirror is incorporated into the outer side panel without taking a single inch of floor space.
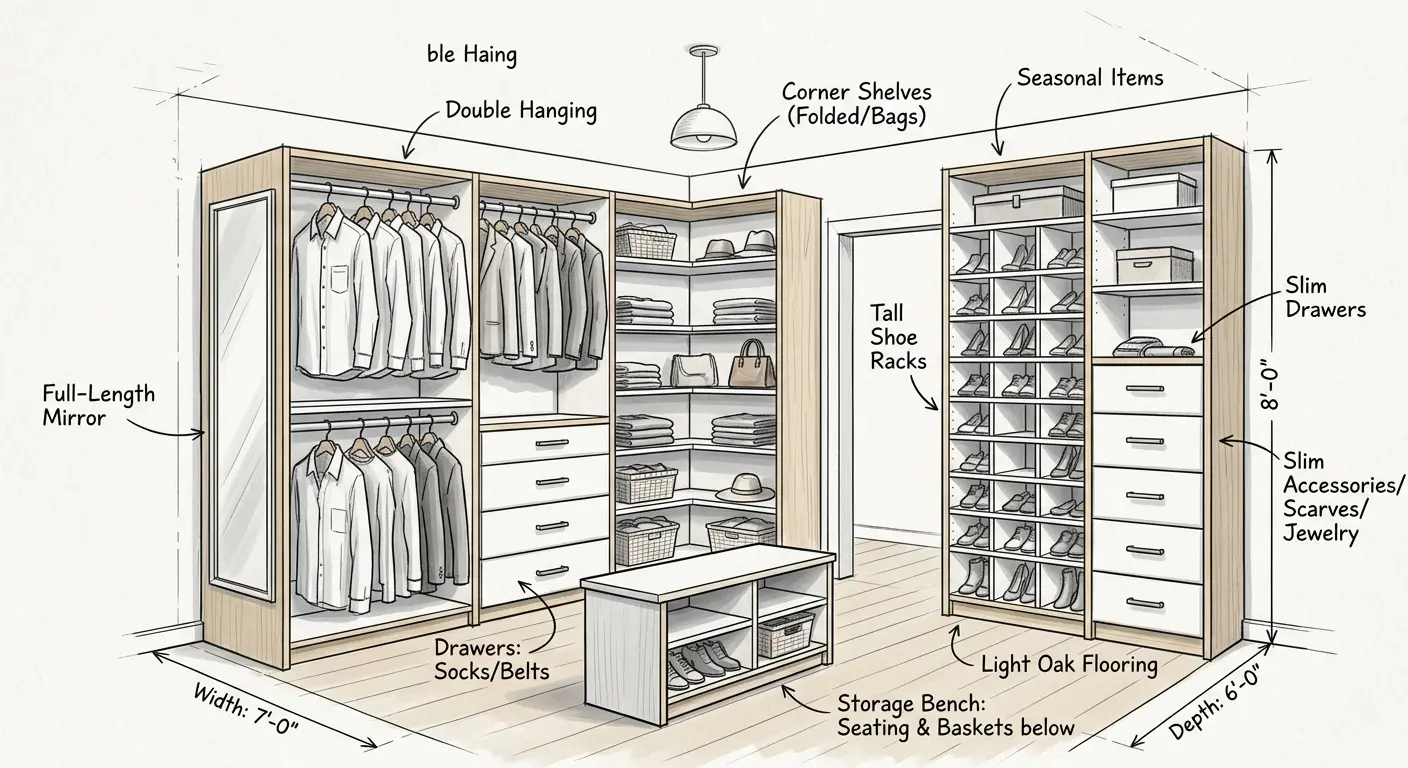
The decisions that make this compact custom walk in closet design work so well:
Double hanging rods on the left wall effectively double the hanging capacity within the same vertical space. Instead of one rail at shoulder height with empty space beneath, you get two rails, one above the other, each holding shirts, jackets, and blouses.
The L-shaped corner shelves instead of a flat wall meeting a flat wall. This avoids the dead zone where things get buried and adds usable open shelving for folded sweaters, jeans, and seasonal bins.
A shallower right wall for the shoe cubbies and slim drawers. Keeping this side at a reduced depth preserves the center walkway so the room feels open rather than like a tunnel you squeeze through.
In any compact custom walk in closet design, the top 18 to 24 inches of wall space is almost always underused. Push your cabinetry close to the ceiling and reserve that upper zone for labeled seasonal bins and boxes. You’ll be surprised how much it adds up.
The Galley-Style Custom Walk In Closet with a Center Island
The galley layout runs two parallel walls of storage facing each other, with a clear aisle down the middle. Add a center island and you have the most storage-dense configuration available for a longer, narrower room.
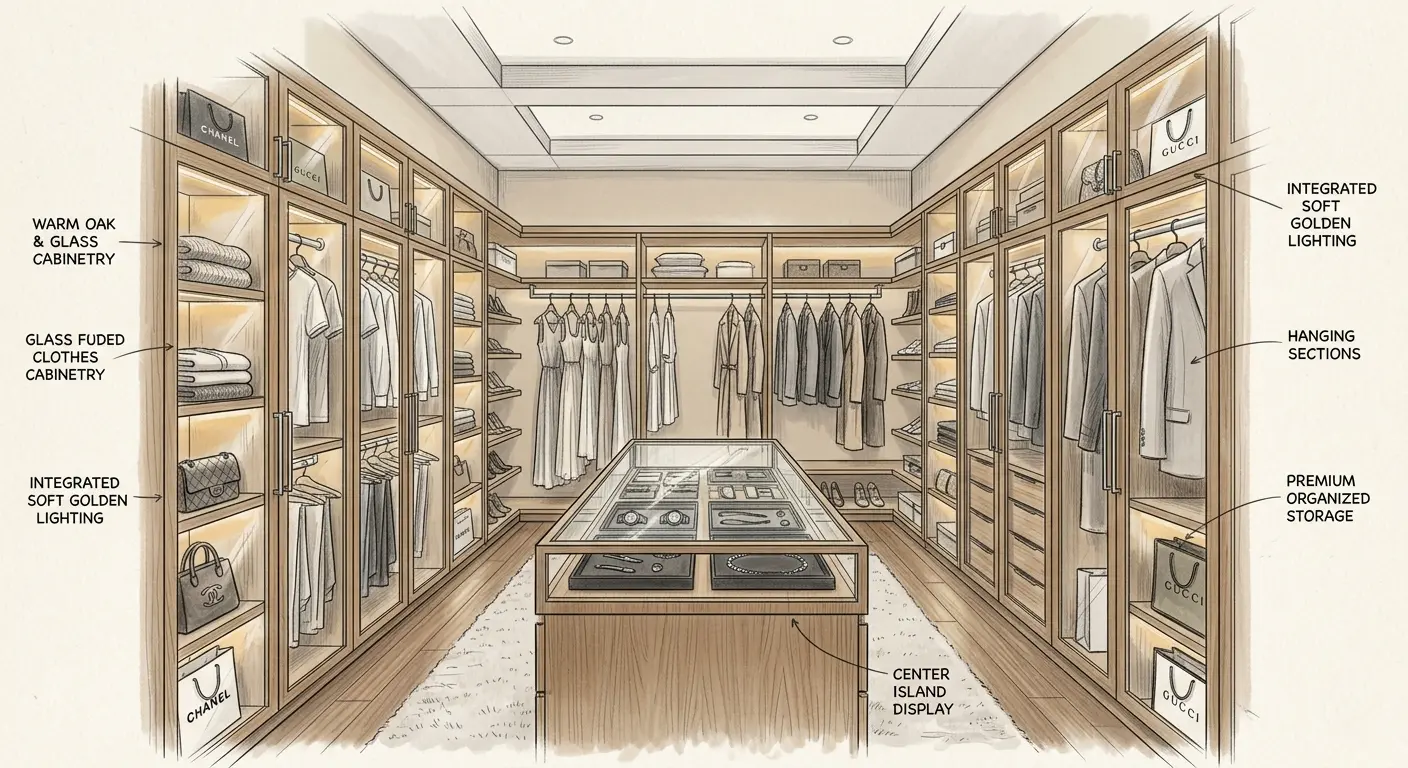
This particular design spans approximately 4.5m wide and 6m deep, with a 3m ceiling featuring a recessed tray detail. The walkway on each side of the center island is 90 cm wide, which is the standard clearance needed for two people to pass each other without friction.
The glass-fronted armoires are one of the standout features here. Tempered glass panels with slim metal frames replace solid cabinet doors, so you can see your entire collection at a glance. Shelves inside are spaced at 35 cm intervals to accommodate folded knitwear, designer bags, and accessories. The hanging sections along the rear and mid-walls split between long hang at 160 cm and double hang at 105 cm per tier.
The center island functions here as a jeweler’s display case. A glass-top surface sits over velvet-lined drawers with structured compartments for watches, necklaces, and cufflinks. The island measures approximately 180 cm L x 80 cm W x 95 cm H, and the toe-kick recessed at the base allows you to stand flush against the glass top comfortably.
This kind of custom walk in closet design is typically the result of a dedicated dressing room in a master suite. But it’s worth knowing the proportions, because even a scaled-down version of the galley-plus-island concept translates well to smaller rooms.
How to Plan Your Custom Walk In Closet: Step by Step
You don’t need a professional designer to plan a custom walk in closet. You do need a clear process. These seven steps will get you from a blank room to a finished layout plan that you can hand to a carpenter or build yourself.
Measure Your Room Accurately
Record length, width, and ceiling height. Mark the door swing, any windows, air vents, light switches, and outlets. These affect where cabinetry can go. Measure twice, every time.
Do a Real Wardrobe Audit
Count your actual items, separated by type: long-hang garments, short-hang garments, folded items, shoes (by type), bags, accessories, drawers needed. Don’t guess. This number directly shapes your zone layout.
Pick Your Layout
Use your room shape and audit numbers to choose between L-shaped, corner, U-shaped, or galley. The layout card comparison earlier in this article is a good starting point. Match the shape, not the aesthetic.
Define Your Storage Zones
Divide the plan into dedicated zones: hanging, folded, shoe, drawer, and display. Each zone serves a different category of item. Mixing zones is what creates the cluttered closets people hate.
Choose Materials and Finishes
Select your primary material (solid wood, oak, lacquered MDF, etc.), one secondary material for interiors, and your hardware finish. Stick to two or three materials maximum. Restraint gives the closet coherence.
Plan Lighting Before the Build
Decide exactly where LED strips, recessed ceiling spots, and any vanity lighting will go. Run cables before cabinetry is installed. Planning lighting after the fact always costs more and delivers worse results.
Check Your Walkway Clearances
You need a minimum of 90 cm (36 inches) of clear aisle space between any two facing storage elements. With a center island, that clearance applies on both sides. This is non-negotiable for a functional space.
5 Storage Zones Every Custom Walk In Closet Design Needs
Regardless of the layout you choose or the size of the room, every well-planned custom walk in closet design is built around the same five storage zones. Think of these as the foundation before any other design decisions get made.
Split into long hang (160 cm+) for dresses, coats, and full trousers, and short hang (90 to 105 cm) for shirts, jackets, and blazers. Double-hang wherever you have short-hang garments to double the capacity.
Open shelves or cubbies for sweaters, jeans, and t-shirts. A shelf depth of 40 to 45 cm works well. Use adjustable shelving so heights can change as your wardrobe does over time.
Flat shelves or angled racks at the base of the run, allowing 30 cm depth per pair. Boots need at least 35 cm of vertical clearance per shelf. Cubby-style storage keeps pairs visible and prevents the pile-up problem.
Soft-close drawers for undergarments, socks, belts, and small accessories. Deep drawers work well for folded knitwear. Slim drawers near eye level are best for jewelry, watches, and sunglasses.
Open cubbies or glass-fronted shelves for bags, hats, and statement items. This is the zone that gives your closet its character. Backlit shelving here creates a significant visual impact with minimal cost.
Lighting in Custom Walk In Closet Designs: The Layer Most People Skip
Lighting is the detail where most custom walk in closet designs quietly fall apart. People invest in beautiful cabinetry and then install a single overhead fixture. The result is a flat, dim room that makes it hard to see colors accurately, find items quickly, or feel like the space was worth the investment.
Good closet lighting works in three distinct layers. Each one does a different job:
2700K to 3000K
3000K recommended
2700K for warmth
The warm color temperature range of 2700K to 3000K is important. It’s flattering to skin tones and clothing colors, without the cold clinical feeling of a higher Kelvin light. When you’re choosing an outfit in the morning, the quality of the light directly affects your perception of how things look.
Plan every lighting circuit, wire run, and strip placement before a single cabinet is installed. Running cables through finished wood after the fact is time-consuming and expensive. This is the most common lighting mistake in custom closet builds, and it’s entirely avoidable.
Choosing the Right Materials for Your Custom Walk In Closet
The material choices in a custom walk in closet design affect more than just the look. They affect durability, how well the space holds up over time, the total build cost, and the maintenance it requires year to year. Here’s a practical breakdown of the most common options:
| Material | Look and Feel | Durability | Cost Range | Best Application |
|---|---|---|---|---|
| Solid Walnut Wood | Rich, warm grain, premium feel | Excellent | High | Visible frames, islands, doors |
| Light Oak / White Ash | Natural, airy, Scandinavian | Very Good | Medium to High | Full cabinetry, modern layouts |
| High-Density Fiberboard (HDF/MDF) | Smooth, clean, paint-ready | Good | Low to Medium | Panels, backing, drawer interiors |
| Lacquered MDF | Matte or gloss, available in any color | Good | Medium | Door fronts, seamless drawer faces |
| Melamine Laminate | Consistent, uniform, practical | Good | Low | Budget builds, internal carcass work |
The most cost-effective approach in high-end custom walk in closet designs is to combine materials strategically: solid wood or real oak veneer for the visible frames, door fronts, and island top, with HDF or MDF for the internal carcass panels that no one sees. You get the premium look and feel where it matters while keeping the overall cost reasonable.
Hardware finishes are worth a quick mention too. The brushed brass and champagne gold seen in the galley-style design reads as warm and refined. Matte black reads as modern and sharp. Brushed nickel or chrome leans contemporary. Pick one and stick with it across all elements: handles, rails, and mirror frames.
Do You Actually Need a Center Island in Your Custom Walk In Closet?
The center island is the most requested feature in custom walk in closet designs right now. And when it works well, it really does work. But it’s not right for every room, and adding one to a space that’s too small for it creates more problems than it solves.
Here’s a clear way to decide:
When you do include one, keep the dimensions practical: between 85 cm and 95 cm tall (standard counter height), 120 to 180 cm long, and no deeper than 60 cm. A toe-kick recessed at the base lets you stand flush against it comfortably. Go deeper than 60 cm and it starts to eat into your walkway without adding proportional function.
Common Mistakes to Avoid in Custom Walk In Closet Designs
Even with the best layout plan, these are the mistakes that come up most often in real builds. Knowing them in advance saves time, money, and the particular frustration of finishing a project and immediately wishing you’d done something differently.
This is the most common issue. When every wall is filled with cabinetry and an island is added, the room can end up with barely enough space to turn around. Map out your 90 cm minimum aisle on the floor plan before you finalize anything.
Designing based on what you think you own rather than what you actually own means the proportions will be off. You’ll end up with too many drawers and not enough hanging space, or vice versa. Count your actual items before committing to a layout.
Standard clothes hangers require a minimum of 60 cm (24 inches) of cabinet depth. Going shallower to save space creates a hanging rail where sleeves stick out and garments are constantly being knocked off. This is a false economy that makes the whole zone frustrating to use.
Once cabinets are in place, running cables through them for LED strips requires drilling through finished wood and chasing channels in walls that are already done. Plan your full lighting scheme on paper at the same time as the cabinet layout, and wire everything before installation begins.
Three different wood species plus painted lacquer plus metal wire shelving in one closet reads as chaotic, not eclectic. The most polished custom walk in closet designs limit themselves to one or two primary materials with a single accent. Fewer choices, made well, always wins.
A clothes rail needs a vertical partition divider every 80 to 100 cm to prevent the rail from sagging under weight. Without these supports, a fully loaded rail will bow visibly within months. This is a structural requirement, not an optional detail.
The Goal of a Custom Walk In Closet Design
The best closet is not the one with the most storage. It’s the one where you can find what you need in 30 seconds without turning on every light. That kind of effortless access is what good custom design actually delivers, and it’s entirely achievable with the right planning.
Your Custom Walk In Closet Is Worth Getting Right
Custom walk in closet designs are not a luxury reserved for large homes or big renovation budgets. The compact 7 x 6 foot example in this article proves that point directly. With the right layout, honest zone planning, and attention to a few structural details, almost any dedicated closet space can become a genuinely organized, well-lit, and visually satisfying room.
Start with your room measurements and a real audit of what you own. Pick the layout that fits your actual floor plan, not the one that looks the most impressive in a photo. Build your zones around your specific storage categories. Then add the materials, hardware, and lighting that tie it together.
Every idea in this guide is something you can act on directly. The first step is simply deciding the space is worth planning properly.



Loving how smooth this site runs on mobile especially here in Malaysia.